The $500 Doily

I make a lot of doilies. There’s a collection of them on our dining table, and we use them as place mats and coasters. Yesterday after my daughters finished the dishes, I found one of the doilies left on the counter, half-wet, with rice stuck to it. It was made with moss-green KnitPicks Curio size 10 thread, a daisy design, not particularly difficult, but striking.

“Just throw it in the washer,” someone said.

“No! That will shrink it and ruin it.”

“So, just make another one.”

…!

This doily took several evenings to finish. If I had to tally up the hours, probably 12 hours  in total. I prefer quality over quantity – other crocheters might be faster. The faster I go, the worse my stitch quality gets. It’s not a race unless you’re Lily Chin competing for the World’s Fastest Crocheter title.

With all those hours and at my usual professional rate, that’s about $500 worth of my time. That’s a $500 doily! Only to me, obviously.

It’s amazing how little value is placed on these beautiful objects, works of art that take so much time and care to make. In my view, it is a reflection of the minimal value placed on women’s time.

Doily Redux: Modern Thread Crochet for your Home

I’ve taken a short break from frantic slipper-making to indulge a creative whim: designing thread crochet candle holders. Well, they’re actually Mason jar covers, and I hope to use them as pendant lamps. Equally gorgeous as tea light holders, these covers are basically cylindrical doilies. I’m fascinated by the interplay of light and shadow created when it’s lit from within by a candle.

Foxglove-candle_edited-1
Light up your home this holiday…also, DIY wedding alert!

This is my latest design: the Foxgloves Lace mason jar cover. The base of the cover is a floral design, making it perfect for a hanging pendant lamp.

Foxglove-bottom

Without a candle, it’s still a lovely piece. Filled with peppermint candies, it would make a nice quick gift. It only took a couple of hours to make this one, so a determined crafter could make several in one day. (Unless you suffer from hand pain like I do – then I recommend taking frequent breaks.)

Foxglove-1

Because of my hand pain problem, I need to alternate between larger yarn and smaller thread. (Just another excuse for having several projects on the go at once!)

Anyway, if you’re planning a DIY wedding, get started on these now! You can make a bunch for centrepieces or favours.

The pattern is available for sale in my Etsy shop and also on Ravelry and Craftsy.

Since I first wrote this, I’ve written two other mason jar patterns. You can purchase them individually or as a collection (save 25% off individual prices by purchasing the collection). The collection is available in my Etsy, Craftsy, and Ravelry stores. On Ravelry, add all three patterns to your cart and the discount will be calculated automatically. Etsy and Craftsy have a separate listing for the pattern collection.

20141215_161246

Houndstooth handbags for Christmas

Houndstooth handbags

For the past week I’ve been whipping up these houndstooth handbags to give as Christmas gifts. I LOVE the pattern, which is by Jennifer Pionk of A Crocheted Simplicity. It’s available to buy on Etsy and on Ravelry. Check out her website for more cute patterns.

I made it in three different colour combinations: tea rose (peach) and white, navy and white, and turquoise blue and white. I used the optional bow embellishment on the tea rose version, and may add a flower to the other two. They look chic without an embellishment.

The tea rose version is made following the pattern exactly, including the separate crocheted belt and bow, which are sewn on afterwards. The houndstooth stitch pattern is a simple two-row repeat. The key to getting the houndstooth checks to pop is to turn your work at the end of each round. Otherwise, it will just look like stripes. It also has a sturdy base made of linked dc which I have not tried before. The other two have slight modifications based on my personal preferences. Instead of a separate belt, I made the contrast stripe part of the bag top, and used single crochet instead of linked dc. The linked dc is easy to do and looks very nice, it’s just that I prefer the single crochet. Also, I’m not a fan of sewing. That’s just me!

The navy bag is made with acrylic yarn, not cotton, and I’m pleased with the results. It’s substantial and looks more suitable for winter because of it’s woolly texture. The turquoise bag is cotton, with a Tunisian simple stitch base. I chose Tunisian for this one because I have trouble counting the rows in linked dc – they blend together too much for my eyes. Tunisian rows are easy to count and easy to crochet into all sides. Christmas is only 3 weeks away, and I have a need for speed right now!

Here are photos of the different bag bases: the linked dc, and the Tunisian. Both make a dense fabric suitable for a bag. (Edit…2018…the other photos have somehow been lost from my media files. Not sure what happened there.)

My daughters want to use their handbags as lunch bags. Although the pattern doesn’t call for one, a lining would help keep the bags clean. I agree that a lining isn’t really necessary, but it would also help the handbags look more finished.

Overall, I give this pattern two thumbs up and will be making many more houndstooth handbags! Next up is one in Mod Green and White, using Lily Sugar’n Cream cotton, then a Holly Berry Red with white using Red Heart With Love.

Peppermint for the holidays and a new pattern!

image3

This year, I’m in love with a Nordic-look red and white theme. I’m working on decorations and gift items with these colours – bright white and real red. Here are the first items in my 2014 holiday collection: the Peppermint handbag and wine bottle carrier set! The pattern is available in my Etsy shop and in my Ravelry store. You can make them both in a weekend using less than three balls of Lily Sugar’n Cream cotton.

Peppermint gift bag set

Review: Craft Daily video subscription

Two posts ago, I mentioned I was doing a trial of the Craft Daily video subscription for one month. Well, the month is up, and here’s my verdict:

Considering most resource sites (like the Interweave store) charge about $19 and up to download just one video, the Craft Daily subscription was worth it. For about $20, I had unlimited access to all of the videos on the site, and I watched at least 15 of them. There are videos by big name designers for everything from basic knitting and crochet techniques to designing your own garments and accessories. The most useful tutorials for me were the Seamless Crochet in the Round with Doris Chan, the Toolbox and Tunisian crochet videos with Lily Chin, and all of the designing videos by Robyn Chachula. Although the earlier seasons of Knitting Daily TV episodes are available at Craft Daily, the newer ones are not. That was disappointing, because the show is not offered by my satellite provider as far as I can tell. I didn’t want to have to purchase them separately.

Lily Chin’s Tunisian tutorials inspired me to try a cowl using Tunisian stitch in the round. Up until then I have made them flat, like this one. My next post will feature the results of my first seamless Tunisian project. The idea for Tunisian cables came from Robyn Chachula’s unexpected crochet stitches video, and from one of her pattern books.

Cabled Tunisian Cowl with buttons

If you are looking for access to lots of videos, clear instructions and demonstrations of techniques and help with specific patterns, a subscription might be a good investment for you. Many of the videos come with free pattern and instruction booklet downloads. You can access the videos as often as you like, as long as your subscription is valid. It’s a great way to try out the many Interweave tutorials on the site. If there’s one you’d like to keep forever, it makes more sense to purchase that one from the Interweave store than to keep subscribing monthly. Browse through the available workshops first and try the previews before you commit.

I am not an affiliate of any of these stores, and this post reflects my own opinion. From one crafter to another, that’s my view.


How to make basic crocheted slipper boots: UPDATED free pattern in women’s sizes S-M-L

IMG_0349

By Gwen Higgins, Blueberry Creek Crafts.

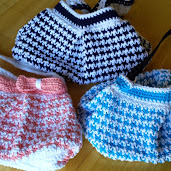
This basic slipper boot is a perfect canvas for embellishment with your own stylistic elements. Try buttons, straps, or tassels. It’s worked from the toe up similar to a sock, so you can adjust the length of each section to custom-fit to your feet. Make the boot as tall as you like. Two balls of Boutique Midnight is just enough to make 12″ tall boots, so you’ll need more yarn if you want taller boots. The pattern is written using standard U.S. terms.

Update December 29, 2014: now includes other sizes, alternate yarn suggestions, and instructions for an improved heel.

For pattern inquiries or comments, email Gwen at gwen.higgins@outlook.com.

Materials

Materials: For sparkly slippers: Red Heart Boutique Midnight, two 70g (2.5 oz)  / 140 m (153 yd) balls, medium (4) weight yarn, crochet hook size 6.0 mm (U.S. 10 / J). Substitute any medium-weight yarn that gives you the same gauge. Just make a test swatch. Other suggested yarns: Red Heart With Love (one to two skeins), Willow Burrow Worsted (two balls), Patons Décor (two balls). After making many pairs, I suggest using one of the alternate yarns. While the Boutique Midnight is very pretty and gives good results, it is not as easy-care, stretches out more, and may not wear as well as the others over time.

Gauge: 13 hdc and 9 rows makes 4” x 4” (10 cm x 10 cm).

In single crochet, 14 sc and 16 rows makes 4” x 4” (10 cm x 10 cm).

Check your gauge and use a different hook size, if needed, to achieve this gauge. You may want to use a smaller hook if your feet are smaller. The boots shown are slightly large for me (I made them for someone with bigger feet), so if your feet are smaller than size 8, use a 5.5mm hook to tighten up the gauge and reduce the boot size.

This pattern is written with ½” negative ease – that means, the finished slipper will be slightly smaller than the actual foot sizes shown, to allow for stretch.

Sizes: Ladies U.S. shoe sizes Small (up to size 6), Medium (up to size 9), and Large (up to size 12).

Instructions are written for smallest size with larger sizes in brackets.

Foot circumference:

  • Small: 7” (17.5 cm)
  • Medium: 8” (20.5 cm)
  • Large: 9” (23 cm)

Foot length:

  • Small: 9” (23 cm)
  • Medium: 10″ (25.5 cm)
  • Large: 11” (28 cm)

Boot height: Approximately 12″ total; 9″ shaft from top of heel, or height of your choice. Foot to ankle is 3.25″ (3.75″, 4.25″).

As per Craft Yarn Council Standard Foot Sizing chart: http://www.craftyarncouncil.com/footsize.html


Make Foot:

(Note: This portion is worked in the round, joining with a slip stitch to the first stitch every round and ch 1 to start the next round.)

Toe:

Chain 4.

Round 1: 7 hdc in 1st ch, sl st to join.Ch 1.

Round 2: 2 hdc in each hdc around, join w sl st. Ch 1. (14 hdc.)

Round 3: *1 hdc in 1st hdc, 2 hdc in next hdc; repeat from * 6 times. Join with sl st. (21 hdc.) For size small, your toe is finished. Continue to Foot portion. For sizes Medium and Large, complete round 4.

Sizes M & L only: Round 4: Ch 1 * 1 hdc in 1st two hdc, 2 hdc in next hdc; repeat from * 6 times. Join with sl st to first hdc. 28 hdc.


Front Foot:

The lower portion of the foot is worked in the round until you reach the ankle opening, as follows:

Work 1 hdc in each hdc around and join with sl st to first hdc. Ch 1 to start the next round. Continue in this manner until the piece measures 4.25” (5.0”, 5.5”) long from the beginning. This is approximately 10 rows (11 rows, 12 rows) in total from the start of the toe.

Decision point: If you need a smaller or larger slipper, this is about the halfway point in the length of the foot. Work fewer or more rows as required to achieve the desired length. From here on, you will work in rows (back and forth) instead of in the round. Do not join at the end of each row; ch 1 and turn your work.


Back of Foot and Heel, Basic Method:

The following rows for the back of the foot and heel are worked back and forth in rows, to make the back of the foot and the heel. Instructions for an alternate, more durable, heel are included on the next page.

Basic Method

Row 11 for size small (row 12 for size medium, row 13 for size large): 1 Hdc in each hdc around, DO NOT JOIN. ch 1, TURN.  (21 hdc (28 hdc, 28 hdc) in row.)

Continue working in hdc in rows until foot measures 8.5” (9.5”, 10.5”) from toe.

Turn heel inside out and use slip stitches to join the back heel seam. Fasten off. Go to boot shaft.


Back of foot and heel, alternate method:

This method produces a more durable and shaped heel. It’s worked in single crochet with decreases at the back of the heel to provide a better fit.

Row 11 (12, 13): 1 sc in each hdc around. Do not join. Ch 1, TURN. (21 (28, 28) sc in row.)

Next row: 1 sc in each sc. Ch 1, turn.

Continue in this manner until foot measures 8” (9”, 10”) from toe.

Shape heel:

Row 1 of heel shaping: Sc in first 8 (10, 10) sc, sc 2 tog, sc in next 1 (4, 4) sc, sc 2 tog, sc in last 8 (10, 10) sc. Ch 1, turn. (You have decreased two stitches on this row and now have 19 (26, 26) sc.)

Row 2 of heel shaping: Sc in first 7 (10, 10) sc, sc 2 tog, sc in next 1 (2, 2) sc, sc 2 tog, sc in last 7 (10, 10) sc. (You have decreased two more stitches and now have 17 (24, 24) sc.)

Join heel seam: Turn heel inside out and slip stitch both sides together. This creates the vertical seam at the back of the heel. Fasten off and weave in ends.


Make boot shaft:

The boot shaft is made by working rounds of hdc (or the stitch pattern of your choice) around the top edge of the rows that form the ankle opening. In general, on the first round make 3 hdc stitches for every two rows, or one hdc for every one row if you made the alternate heel. This will give evenly-spaced stitches around. I sometimes use single crochet for the first round to give a neater look. It’s your choice.

Join again just to left side of heel seam with slip stitch. Ch 2.

Round 1: Work 15 (16, 17) hdc evenly along left side, 2 hdc in centre front, and 15 (16, 17) hdc along other side. Join. There are now 32 (34, 36) hdc in the round. Join with a slip stitch to first hdc.

Round 2: Ch 2, hdc in same stitch and one hdc in each hdc around. The chains at the beginning of each round are not counted as stitches.

Rounds 3 through 18: Work as for round 2 (one hdc in each hdc) or until desired height (18 rows or your choice). Total height pictured including heel is approximately 12″. Ch 1.

Last 5 rows: One sc in each sc around, join to first sc with sl st. Ch 1 to start next round, except on last round.

Fasten off and weave in ends.


Abbreviations:

Ch: chain

Hdc: half-double crochet

Sc: single crochet

Sl st: slip stitch


Leave a comment with a link to your own version of these boots!


Copyright: 2014 G. Higgins.

Feel free to use this pattern to make items for sale, but please give credit to this pattern & my site.


For more patterns and gift ideas, visit Blueberry Creek Crafts. Happy crafting!


Tunisian cables and The Walking Dead

It must be autumn, because I’m watching The Walking Dead. Not just one episode, either. Multi-episode binge watching on Netflix. My husband is out hunting and I am free to work on my projects and watch what I like.

Just like the seasons, my TV habits and my creative life operate in cycles. After making a bunch of crocheted socks last winter while working up north, I didn’t touch a knitting needle or crochet hook all spring or summer, focusing on scrapbooking and photo albums instead. Every year autumn brings me back to crochet and knitting, and this year I’ve come back to it excited and inspired. I’ll be trying new techniques and coming back to some of my old favourites.

One technique I’ve returned to is Tunisian crochet. The thick, cozy fabric it makes is perfect for winter accessories. I haven’t made anything this way for a few years, but after watching Lily Chin’s video tutorial on two-colour Tunisian crochet in the round on Craft Daily, I decided to dig out my hooks and get crafting. My first project was an iPad Air slipcover, made with Red Heart Treasure yarn in Tapestry. The Tunisian simple stitch really pops in this variegated yarn. The fabric is thick and gives some padding to protect the iPad.

IMG_0494_edited-1

The next project, my WIP for the weekend, is a new design by me. It’s a boy’s jacket, worked in Tunisian simple stitch with cables on the front and back of the jacket. Normally when I work cables I do them in knitting. I have avoided crochet cables, because I thought they would look cheesy, but I was wrong. I love the results! With this plain acrylic yarn (Red Heart Love in Pewter), the cables can stand out and don’t get lost in the texture of  the yarn. If you want to try Tunisian, there are some easy free patterns on CrochetMe.

IMG_0491_edited-1
WIP: Cabled Tunisian simple stitch boy’s jacket, front.
IMG_0492_edited-1
WIP: Cabled Tunisian simple stitch boy’s jacket, back, unblocked, worked up to arm holes.

I still think the cables look better on Tunisian fabric than on regular crocheted items, and I’d like to try making the pillow shown in Toni Rexroat’s post about crochet for the home on Crochet Me in Tunisian. That’s another project for another night of The Walking Dead.

Holiday Gift Ideas: Five Crochet Resources

one of my thread crochet projects


I used to love that French crochet magazine Magic Crochet, which is no longer in print. Jam-packed with designs for doilies and table runners made in thread, with both graphic and written instructions, it featured many lovely and challenging patterns. Now, when shopping for crochet magazines at the newsstand, I’m often disappointed by the usual selection. It’s wonderful that crochet has experienced a revival, but we in North America have been taken back through all the beginner stuff in the past few years. Fortunately the market is maturing a bit and there is a rich treasure trove of inspiration to be found online from North America and beyond. Here are a few of my favourites:

  1. Crochet Me, an online magazine by Interweave. Interweave Crochet is an excellent publication. Yes, it’s American, but it is far and away above the average magazines.This site has downloadable patterns and e-books, videos and techniques, a gallery of members’ work, and articles by the editors. I enjoyed this post on Crocheted Gifts which encourages us to think beyond hats and scarves. Although beginners are welcomed with plenty of how-to guides, Interweave is also an excellent resource for intermediate and advanced crafters, and their patterns are anything but ordinary. Essays on the history of crochet are frequently published in these issues. http://www.crochetme.com/blogs/crochet_daily/archive/2012/10/04/beyond-hats-crochet-gift-ideas.aspx
  2. Duplet Magazine and Zhurnal MOD – these are Russion publications with distinctive use of traditional Irish modular crochet patterns. If you thought crochet thread was only for doilies, you must look at this. The magazines only have graphic patterns for the motifs, not full instructions for the garments shown. The text is in Russian but the graphic patterns transcend language and you will love the beautiful outfits. They have everything from bikinis to wedding dresses. If you like to crochet with thread, you will love this magazine. (Note: subscriptions are not available in Canada. I bought a few issues from Ebay.)
  3. Elann.com, for yarns, patterns, tools, and notions. Based in Canada, Elann sources excellent quality natural fibre yarns including alpaca, wool, and organic cotton. Check often for great deals on luxury yarns from famous name companies. They also have their own store brand with lovely yarns and exclusive patterns. I have always been happy with my orders from Elann. The delivery is quick and the service is excellent.
  4. Garnstudio Drops Design – this is a manufacturer’s website with a rich pattern library of both knit and crochet. Their patterns feature trendy European designs for adults and children.
  5. Vogue Knitting – long one of my favourites (for knitting, sewing, and crochet), Vogue has published a number of excellent crochet patterns, and recently published an entire issue devoted to crochet. This is high-fashion, wearable stuff. My mother owned a copy of the Vogue Sewing book, which I read cover to cover (still have to learn to sew, though!). I own the Vogue Knitting book, which is an authoritative guide to design and finishing techniques, many of which can be translated for crochet. Their online crochet site also contains a section of fine finishing techniques for crocheted garments.

What are your favourites? Do you love or loathe the Granny Square? What projects do you have on the go?

Happy crafting,

G.